Saturday, September 22, 2012

How to enable SNMP Monitoring on Ubuntu Server 12.04.2

Install SNMPD 

$ sudo apt-get install snmpd

Create a backup file of snmpd.conf original file that we will edit later

$ sudo mv /etc/snmp/snmpd.conf /etc/snmp/snmpd.conf.ori

Create the new snmpd.conf file 

$ sudo vim /etc/snmp/snmpd.conf

Add the file with these lines

rocommunity public
syslocation "Your Location"
syscontact admin@domain.com

Then edit the /etc/default/snmpd file

$ sudo vim /etc/default/snmpd

Disable this line below by adding # in front of the line 

#SNMPDOPTS='-Lsd -Lf /dev/null -u snmp -g snmp -I -smux -p /var/run/snmpd.pid'

And add a new line 

SNMPDOPTS='-Lsd -Lf /dev/null -u snmp -I -smux -p /var/run/snmpd.pid -c /etc/snmp/snmpd.conf'

Restart the SNMPD service

$ sudo /etc/init.d/snmpd restart
* Restarting network management services

Then you're done!

Monday, August 20, 2012

How to enable MySQL remote access on Ubuntu Server 12.04

By default MySQL on Ubuntu Server 12.04 can only be accessed from localhost (127.0.0.1). 

If we need to access it from another computer on the network, we must do the following step

Edit MySQL Configuration

$ sudo vim /etc/mysql/my.cnf

#comment out this line (add # in front of the line)
#bind-address           = 127.0.0.1

Restart the server

$ sudo service mysql restart
mysql stop/waiting
mysql start/running, process 13081

Then we need to add user info to the database

$ mysql -u root -p
Enter password: 
Welcome to the MySQL monitor.  Commands end with ; or \g.
Your MySQL connection id is 77
Server version: 5.5.24-0ubuntu0.12.04.1 (Ubuntu)

Copyright (c) 2000, 2011, Oracle and/or its affiliates. All rights reserved.

Oracle is a registered trademark of Oracle Corporation and/or its
affiliates. Other names may be trademarks of their respective
owners.

Type 'help;' or '\h' for help. Type '\c' to clear the current input statement.

mysql> grant all on [database_name].* to [user]@[ip_address] identified by '[password]'


Query OK, 0 rows affected (0.00 sec)

mysql> exit
Bye


That's all!

Reference:

http://ubuntuforums.org/showthread.php?t=799386

Sunday, August 19, 2012

Installing and Configuring Freeradius + MySQL and Daloradius + MySQL on Ubuntu Server 12.04 for Mikrotik Hotspot/PPoE/PPTP (updated)

Installing and Configuring Freeradius

The first step is to Install Freeradius (ensure you already update your apt with apt-update)
$sudo apt-get install freeradius
 * Starting FreeRADIUS daemon freeradius                                 [ OK ] 
Setting up freeradius-utils (2.1.10+dfsg-3build2) ...

Then prepare the database for freeradius. Create database radius and assign username and password for accessing it. 

# mysql -u root -p
Enter password: 
Welcome to the MySQL monitor.  Commands end with ; or \g.
Your MySQL connection id is 51
Server version: 5.5.24-0ubuntu0.12.04.1 (Ubuntu)

Copyright (c) 2000, 2011, Oracle and/or its affiliates. All rights reserved.

Oracle is a registered trademark of Oracle Corporation and/or its
affiliates. Other names may be trademarks of their respective
owners.

Type 'help;' or '\h' for help. Type '\c' to clear the current input statement.

mysql> create database radius; 
mysql> grant all on radius.* to radius@localhost identified by "thepassword";
Query OK, 0 rows affected (0.00 sec)

The next step was to insert the database schema and I realized that I could not find the database scheme in /etc/freeradius.

Obviously I should install freeradius-mysql package first. 

#apt-get install freeradius-mysql
Setting up freeradius-mysql (2.1.10+dfsg-3build2) ...
 * Reloading FreeRADIUS daemon freeradius                                [ OK ] 

Then insert the database scheme 

# mysql -u root -p radius < /etc/freeradius/sql/mysql/schema.sql 
Enter password:
# mysql -u root -p radius < /etc/freeradius/sql/mysql/nas.sql 
Enter password: 

Now we try to insert new user for testing purpose in database. 

# mysql -u root -p
Enter password: 
Welcome to the MySQL monitor.  Commands end with ; or \g.
Your MySQL connection id is 72
Server version: 5.5.24-0ubuntu0.12.04.1 (Ubuntu)

Copyright (c) 2000, 2011, Oracle and/or its affiliates. All rights reserved.

Oracle is a registered trademark of Oracle Corporation and/or its
affiliates. Other names may be trademarks of their respective
owners.

Type 'help;' or '\h' for help. Type '\c' to clear the current input statement.

mysql> use radius;
Reading table information for completion of table and column names
You can turn off this feature to get a quicker startup with -A

Database changed
mysql> INSERT INTO radcheck (UserName, Attribute, Value) VALUES ('sqltest', 'Password', 'testpwd');
Query OK, 1 row affected (0.04 sec)

mysql> exit
Bye

The next step is we need to configure the Freeradius files. 

Edit /etc/freeradius/sql.conf file. Setting database type, login and password that we already setup before.

# vim /etc/freeradius/sql.conf
  
  database = mysql
  login = radius
  password = thepassword

  readclients = yes

Then edit the /etc/freeradius/sites-enabled/default file

# vim /etc/freeradius/sites-enabled/default 

    Uncomment sql on authorize{}
    # See “Authorization Queries” in sql.conf
    sql

    Uncomment sql on accounting{}
    # See “Accounting queries” in sql.conf
    sql

    Uncomment sql on session{}
    # See “Simultaneous Use Checking Queries” in sql.conf
    sql

    Uncomment sql on post-auth{}
    # See “Authentication Logging Queries” in sql.conf
    sql 
      
Then we edit /etc/freeradius/radiusd.conf file

# vim /etc/freeradius/radiusd.conf 

  #Uncomment #$INCLUDE sql.conf
  $INCLUDE sql.conf

To test our configuration, first we must stop the freeradius service (if already running) 
# /etc/init.d/freeradius stop
 * Stopping FreeRADIUS daemon freeradius                                 [ OK ]

Then run this command to run freeradius in debugging mode. If there is no error, you are good to go.
#freeradius -X

On a new shell or window we tested the connection

$ radtest sqltest testpwd localhost 18128 testing123
Sending Access-Request of id 65 to 127.0.0.1 port 1812
User-Name = "sqltest"
User-Password = "testpwd"
NAS-IP-Address = 127.0.1.1
NAS-Port = 18128
rad_recv: Access-Accept packet from host 127.0.0.1 port 1812, id=65, length=20

The test running well with Accept response from the server.

To enable Mikrotik device to access our server we need to add client in clients.conf file.

#vim /etc/freeradius/clients.conf

client 10.0.0.0/8 {

        secret = testingpassword
        shortname = testing
        nastype= mikrotik
}

*note: we need to stop freeradius -X and then running it again to test our configuration

Update (Jan 27, 2013):  If we want to add specific value for Mikrotik, we need to add mikrotik dictionary

#vim /etc/freeradius/dictionary 


Then add this line below


$INCLUDE  /usr/share/freeradius/dictionary.mikrotik


Mikrotik Configuration

We need to configure our Mikrotik devices to use our new radius server.  We need to login to Mikrotik device and configure the radius in Radius menu. 

Below image is an example of our configuration. 


*Note: we increase timeout settting to 3000ms to enable invalid login notifications. (not working with default 300ms)

Daloradius Installation 

First, we need to download daloradius file 

$wget http://downloads.sourceforge.net/project/daloradius/daloradius/daloradius0.9-9/daloradius-0.9-9.tar.gz?r=http%3A%2F%2Fsourceforge.net%2Fprojects%2Fdaloradius%2Ffiles%2F&ts=1345296201&use_mirror=nchc

Rename and extract the file 

# tar xvfz daloradius-0.9-9.tar.gz
# mv daloradius-0.9-9 daloradius

Move the file to the web server directory. In this case I use apache on Ubuntu so the location is at /var/www

# mv daloradius-0.9-9 daloradius
# mv daloradius /var/www

Then we need to setup the database. Because already setup the freeradius using MySQL, so we don't need new database. All we need to do is to import the daloradius scheme into our existing radius database.

# cd /var/www/daloradius/contrib/db
# mysql -u root -p radius < mysql-daloradius.sql

After database successfully altered, we need to configure the daloradius setting.

#vim /var/www/daloradius/library/daloradius.conf.php

Change the database password 

$configValues['CONFIG_DB_PASS'] = 'thepassword';

Then we can try to access daloradius using http://ipaddressoftheserver/daloradius

*Note: In my installation, i had a problem because I didn't have php5-gd php-pear and php-db packages installed on my Ubuntu server. 

To deal with this problem you can install the packages using

# apt-get install php5-gd php-pear php-db 


References, 

Mastaqim (2012), http://www.mastaqim.web.id/2012/08/install-freeradius-mysql-ubuntu-server.html
Daud (2012), http://daud.rasadigital.com/install-daloradius-di-ubuntu-server/


Thursday, May 10, 2012

How to set environment variables in Mac OS X Lion (For PHPunit purpose)

In my recent web application development, I need PHPUnit to run in my Macbook Pro Mac OS Lion X Lion. In my previous post I installed PHPUnit using PHP pear on XAMPP. 

Now I need to run it without evoking all the the path to the XAMPP bin files located at /Applications/XAMPP/xamppfiles/bin

So I need to set the environment variabel setting location in my Mac OS X Lion. We can do this with two easy steps.  

First: Open /etc/path files with terminal:

$ sudo vim /etc/path 

Second: Add /Applications/XAMPP/xamppfiles/bin to the bottom of the file. In my Mac, it look like this: 
/usr/bin
/bin
/usr/sbin
/sbin
/usr/local/bin
/Applications/XAMPP/xamppfiles/bin
~                                  

That's All

Wednesday, May 09, 2012

Installing PHPUnit on XAMPP Mac OS Lion


How to Install PHPUnit on XAMPP installed on Mac OS X Lion: 

First you need to add the phpunit channel: 

$ sudo /Applications/XAMPP/xamppfiles/bin/pear channel-discover pear.phpunit.de
Adding Channel "pear.phpunit.de" succeeded
Discovery of channel "pear.phpunit.de" succeeded

$ sudo /Applications/XAMPP/xamppfiles/bin/pear channel-discover pear.symfony-project.com
Adding Channel "pear.symfony-project.com" succeeded
Discovery of channel "pear.symfony-project.com" succeeded


Then Install Pear PHPUnit with the following command:
$ sudo /Applications/XAMPP/xamppfiles/bin/pear install phpunit/PHPUnitDid not download optional dependencies: phpunit/PHP_Invoker, use --alldeps to download automatically
phpunit/PHPUnit can optionally use package "phpunit/PHP_Invoker" (version >= 1.1.0)
downloading PHPUnit-3.6.10.tgz ...
Starting to download PHPUnit-3.6.10.tgz (118,595 bytes)
..........................done: 118,595 bytes
downloading YAML-1.0.6.tgz ...
Starting to download YAML-1.0.6.tgz (10,010 bytes)
...done: 10,010 bytes
install ok: channel://pear.symfony-project.com/YAML-1.0.6
install ok: channel://pear.phpunit.de/PHPUnit-3.6.10


References:
http://jeffreybarke.net/2010/08/how-to-install-phpunit-with-mamp/

Wednesday, October 19, 2011

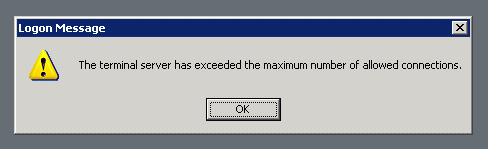
Mengatasi Masalah Logon Message "The terminal server has exceeded the maximum number of allowed connections"


Seringkali ketika kita mengakses Microsoft Windows Server secara remote, tulisan "The terminal server has exceeded the maximum number of allowed connections" muncul. Sehingga kita tidak bisa mengakses komputer tersebut secara remote, ini situasi yang tidak mengenakkan bagi Administrator yang mengandalkan Remote Desktop Connection untuk mengakses servernya.

Sebenarnya pesan itu disebabkan karena server membatasi koneksi remote yang aktif. Apabila pada saat kita melakukan Remote Desktop dan mengakhirinya dengan hanya menekan tombol close, tanpa melakukan logout terlebih dahulu. Maka Windows akan mencatat bahwa masih ada user yang terkoneksi. Dan jumlah koneksi inipun dibatasi jumlahnya.

Walaupun pembatasan dilakukan pada sesi Remote Desktop, pada sesi console banyaknya user yang melakukan remote tidak dibatasi. Oleh karena itu kita bisa melakukan trik berikut ini apabila terjadi masalah.

Klik Windows -> Run

Kemudian ketikan mstsc /v:00.00.00.00 /f -console

Dimana 00.00.00.00 merupakan IP address dari komputer yang anda ingin remote.

Perintah ini akan menggunakan sesi console untuk masuk ke dalam komputer yang anda remote dan setelah itu anda dapat membuka Terminal Service Manager untuk mereset user yang "nyangkut" tadi.

Selamat Mencoba!


Referensi:


Monday, April 11, 2011

Artikel Untuk Domainkeys di Zimbra

http://layangan.com/asfik/blog/2010/08/13/domainkeys-identified-mail-di-zimbra-postfix/

http://blog.pnyet.web.id/2010/03/17/improving-domain-key-di-zimbra.html

http://vavai.com/2010/12/22/implementasi-domainkeys-pada-zimbra-sles-11-sp1-menggunakan-opendkim/

Done!

Saturday, December 11, 2010

How To Install Nagios on Ubuntu 10.04


References:
  • http://library.linode.com/server-monitoring/nagios/ubuntu-10.04-lucid
  • http://www.ubuntugeek.com/nagios-network-monitoring-system-setup-in-ubuntu.html
  • https://help.ubuntu.com/10.04/serverguide/C/nagios.html

How To Monitor Network with Ntop on Ubuntu 10.04 and Mikrotik


Install Ntop

$sudo apt-get install ntop

Next, Configure Ntop

Set Admin Password

$sudo ntop --set-admin-password

Restart Ntop Service

$sudo /etc/init.d/ntop restart

Then check if your ntop already running by visiting

http://[your_ntop_server_ip]:3000 (without [ ])

Next, we configure ntop to receive Mikrotik's traffic flow

Select Menu: Plugin -> NetFlow -> Activate
Select Menu: Plugin -> NetFlow -> Configure
Edit the Netflow Name = Mikrotik (activate)
Edit Local Collector UDP Port = 2055
Edit Virtual NetFlow Interface Network Address = [your_mikrotik_ip_in_cidr_format]
Select Admin -> Switch Interface -> Select Mikrotik
If your ntop service is up and running, next step is to configure mikrotik.

Enable traffic-flow on mikrotik by following these steps below:

[admin@Mikrotik] > /ip traffic-flow
[admin@Mikrotik] /ip traffic-flow> set enabled=yes
[admin@Mikrotik] /ip traffic-flow> print
enabled: yes
interfaces: all
cache-entries: 4k
active-flow-timeout: 30m
inactive-flow-timeout: 15s
[admin@Mikrotik] /ip traffic-flow> target
[admin@Mikrotik] /ip traffic-flow target> add address=[your_cacti_server_ip]:2055 \
\... version=9
[admini@Mikrotik] /ip traffic-flow target> print
Flags: X - disabled
# ADDRESS VERSION
0 [your_cacti_server_ip]:2055 9
[admin@Mikrotik] /ip traffic-flow target> print
Flags: X - disabled
# ADDRESS VERSION
0 [your_cacti_server_ip]:2055 9

After a while your ntop will began collecting data from Mikrotik traffic Flow. Done!

*Update:

It seems that the current version of libpcap in Ubuntu 10.04 has bug in it. So I need to manually upgrade to the new version (libpcap-dev_1.1.1-2_all.deb)

References:
  • http://fisikaunud.wordpress.com/2008/10/08/network-monitor-ntop-di-windows-dengan-mikrotik/
  • http://www.mikrotik.com/testdocs/ros/2.9/ip/traffic-flow.php
  • https://help.ubuntu.com/community/Ntop

Friday, December 10, 2010

Mengganti timezone Ubuntu Server Menjadi Waktu Indonesia (Asia/Jakarta)


Ganti isi file di bawah ini menjadi Asia/Jakarta

user@ubuntu1004:~$ sudo vim /etc/timezone

Kemudian konfigurasi ulang dengan perintah di bawah

user@ubuntu1004:~$ sudo dpkg-reconfigure --frontend noninteractive tzdata

Current default time zone: 'Asia/Jakarta'
Local time is now: Fri Dec 8 18:12:31 WIT 2010.
Universal Time is now: Fri Dec 8 11:12:31 UTC 2010.

How to Enable SNMP Monitoring on Mikrotik

Open New Winbox Terminal or SSH shell

Enable SNMP
[user@Mikrotik] > /snmp
[user@Mikrotik] /snmp > set enabled=yes contact=[your_name] location=[your_location]

Next, set disable community public read access
[user@Mikrotik] /snmp> community
[user@Mikrotik] /snmp community> print
# NAME ADDRESS SECURITY READ-ACCESS
0 public 0.0.0.0/0 none yes
[user@Mikrotik] /snmp community> set public read-access=no

Then add your community name and specify access ip address
[user@Mikrotik] /snmp community> add name=network address=192.168.1.1/24
[user@Mikrotik] /snmp community> print
# NAME ADDRESS SECURITY READ-ACCESS
0 public 0.0.0.0/0 none no
1 network 10.1.1.0/24 none no
[user@Mikrotik] /snmp community> set network read-access=yes

That's it! Then prepare your SNMP monitoring software!

Good Luck!

How to Install Cacti in Ubuntu 10.04 for Mikrotik monitoring

Update Ubuntu package list

apt-get update
apt-get upgrade

Install prerequired packages

apt-get install snmpd snmp mysql-server apache2 libapache2-mod-php5 \
php5-mysql php5-cli php5-snmp

Install cacti

apt-get install cacti

- Configuring php-adodb -> Select OK
- Configuring cacti (select webserver) -> Select Apache2
- Configuring cati (dbconfig-common) -> Select Yes
- Insert your MySQL password
- Insert your MySQL Cacti Administration password

Open your cacti control panel in http://localhost/cacti

Then configure your cacti using tutorial below:
  • http://www.nixnux.or.id/2008/11/15/graphing-mikrotik-queue-simple-and-queue-tree-with-cacti/


Monday, October 19, 2009

12 More Photography Quotes I Should Know

  1. “Be daring, be different, be impractical, be anything that will assert integrity of purpose and imaginative vision against the play-it-safers, the creatures of the commonplace, the slaves of the ordinary.” – Peter Lindbergh (submitted by Brian)
  2. “The important thing is not the camera but the eye.” – Alfred Eisenstaedt (submitted by Beate)
  3. “There are two people in every photograph: the photographer and the viewer” – Ansel Adams (submitted by Scott)
  4. “To me, photography is the simultaneous recognition, in a fraction of a second, of the significance of an event as well as of a precise organization of forms that give that event its proper expression.” – Henri Cartier-Bresson (submitted by Kelly Anne)
  5. “I always thought good photos were like good jokes. If you have to explain it, it just isn’t that good.” – Anonymous (submitted by Mei Teng)
  6. “If your photographs aren’t good enough, you’re not close enough.” – Robert Cappa (submitted by Eddy) (note: as Matt pointed out in comments, Robert Cappa sadly died from stepping on a land mine ‘It is possible to get too close!’
  7. “A lot of photographers think that if they buy a better camera they’ll be able to take better photographs. A better camera won’t do a thing for you if you don’t have anything in your head or in your heart.” -Arnold Newman (submitted by Matt Needham)
  8. “Pictures, regardless of how they are created and recreated, are intended to be looked at. This brings to the forefront not the technology of imaging, which of course is important, but rather what we might call the eyenology (seeing).” -Henri Cartier-Bresson (submitted by Matt Needham)
  9. “The word ‘art’ is very slippery. It really has no importance in relation to one’s work. I work for the pleasure, for the pleasure of the work, and everything else is a matter for the critics.” -Manuel Alvarez Bravo (submitted by Matt Needham)
  10. “People say photographs don’t lie, mine do.” -David LaChapelle (submitted by Matt Needham)
  11. “The single most important component of a camera is the twelve inches behind it.” – Ansel Adams (submitted by raisingladders)
  12. “You cannot depend on your eyes if your imagination is out of focus” – Mark Twain (submitted by dannyboy)

Source: http://digital-photography-school.com/12-more-photography-quotes-you-should-know

Tuesday, March 24, 2009

Koneksi Wireless di ruang Kelas Magister Informatika ITB


Di post ini saya cuman coba share hasil speedtest dari koneksi internet ITB melalui Wireless Tehnik Lingkungan ITB. Tehnik Lingkungan? Ya, memang benar. Karena di gedung kelas di STEI dekat Lab Sistem dan Sinyal ini (STEI) tidak ada wireless network yang bisa digunakan! Ya jadinya di kelas saya harus menumpang ke wireless gedung sebelah yang berjarak hampir 75m. 

Hasil test pagi ini (Jam 9an), cukup mengejutkan karena saya hampir bisa mendapatkan 1mbps untuk hasil speedtest ke San Diego, CA (USA). Wow, hasil yang cukup mengejutkan bagi saya sendiri. Walaupun sepertinya sangat jarang bisa mendapatkan hasil ini di ruang kelas yang fakir sinyal ini. 

Yah semoga aja ke depannya pihak STEI mau menyediakan wireless access point yang dapat diakses secara bebas oleh mahasiswa magisternya. 

Monday, February 23, 2009

How to Install DHCP Server on Ubuntu 8.04

1. Edit dhcpd.conf file

#vi /etc/dhcp3/dhcpd.conf

# Sample /etc/dhcpd.conf
# (add your comments here)
default-lease-time 600;
max-lease-time 7200;
option subnet-mask 255.255.255.0;
option broadcast-address 10.0.0.255;
option routers 10.0.0.1;
option domain-name-servers 10.0.0.1, 10.0.0.2;
option domain-name "mydomain.example";

subnet 10.0.0.0 netmask 255.255.255.0 {
range 10.0.0.20 10.0.0.200;

2.  Set Default Interface for broadcasting DHCP 

# vi /etc/default/dhcp3-server

# Sample /etc/default/dhcp3-server
INTERFACES="eth1"

3. Start DHCP Service

# /etc/init.d/dhcp3-server start


Reference
http://www.jusupov.com/2007/07/06/how-to-install-dhcp3-server-in-ubuntu/


Sunday, October 05, 2008

Sistem Email Open Source yang Lengkap

Baru-baru ini aku mengalami masalah dengan server email yang berbasis Qmail (menggunakan tutorial qmailrocks+updates). Masalah yang terjadi berkaitan dengan qmail scanner yang berfungsi untuk menscan email dari virus dan juga spam yang menjengkelkan itu. 

Walaupun server email sudah kembali berjalan, aku masih mempertimbangkan untuk melakukan migrasi ke server email yang baru. Pertimbangan mengapa aku ingin melakukan migrasi adalah, instalasi qmail yang aku lakukan sudah tidak update lagi, sudah terlalu banyak bug dan juga patch-patch yang harus ditambahkan di instalasi qmail ini. 

Belum lagi webmail yang tidak terintegrasi langsung ke sistem yang berjalan. Squirrelmail walaupun berjalan dengan baik selama ini, membutuhkan banyak plugin untuk berbagai fungsi. Tampilan Squirremail ini juga sudah kelihatan ketinggalan zaman. 


Walaupun ada berbagai alternatif webmail yang lain, seperti Horde yang proses instalasinya cukup sulit itu dan juga Roundcubemail, webmail client yang menggunakan AJAX sebagai keunggulan utamanya. Tapi kembali lagi ke masalah awal, semua webmail client ini tidak terintegrasi langsung ke dalam sistem. 

Ketika ada masalah dengan mail server yang menggunakan qmail ini, akupun mulai mencari alternatif mail server yang lain. Dan syarat yang aku inginkan adalah Mail Server dengan Sistem yang terintegrasi. Yang dimaksudkan dengan terintegrasi disini adalah Mail Server ini haruslah mempunyai tampilan administrasi user, webmail client, anti virus dan anti spam yang dapat langsung diakses dari satu control panel yang web based tentunya. 

Hmm... hal di atas sepertinya sesuatu yang istimewa sekali dibandingkan dengan instalasi qmail yang aku punya sekarang ini. Walaupun untuk administrasi domain dapat menggunakan Vqadmin dan administrasi user menggunakan Qmailadmin tetapi tetap saja belum dapat memuaskan aku. 

Akupun mulai mencari sebuah sistem email yang terpadu yang dapat diandalkan dan syarat utamanya adalah open source dan mempunyai dukungan komunitas yang luas. Sehingga bila ada masalah yang dialami nantinya diharapkan dapat mudah diatasi. 

Kemudian akupun menemukan deepOfix Mail Server, sebuah distribusi linux yang sudah terintegrasi dengan Mail Server dan tampilan administrasi yang cukup impresif. Aku sudah mencoba untuk menginstallnya di VMWare dan dapat berjalan dengan baik, namun deepOfix ini sepertinya masih dalam tahap pengembangan karena tidak adanya manual untuk administrasi dan juga dukungan forum (ini yang paling penting). 


Selanjutnya dalam pencarianku, aku menemukan Zimbra sebuah platform Collaboration Suite yang sangat mengejutkanku. Aku tidak menyangka bahwa ada platform mail server yang lengkap dengan tampilan dan fitur yang cukup hebat untuk sebuah mail server yang bersifat open source. 


Setelah melihat fitur-fiturnya. Akupun mulai "sangat" mempertimbangkan untuk pindah ke platform baru ini. Apalagi Zimbra didukung oleh komunitas yang cukup kuat. Walaupun demikian permasalahan utama untuk Zimbra ini adalah, Zimbra membutuhkan resources sistem yang cukup besar. Memory minimal untuk produksi adalah 2GB dan yang direkomendasikan 4GB. Wah, berarti aku harus menggunakan sistem 64bit karena 32bit hanya support sampai 3GB saja. 

Kemudian aku harus melakukan migrasi account user dan email-emailnya bila ingin menggunakan sistem email yang baru ini. Pekerjaan yang cukup berat tapi menjanjikan kepuasan bila dapat berhasil dilakukan... hehehe...

Aku juga berencana untuk mendokumentasikan proses instalasi yang aku lakukan nantinya. Aku sudah berhasil untuk melakukan instalasi di VMWare dan tinggal menunggu untuk melakukan instalasi di mesin produksi dengan memory 3GB. 

Squid ZPH HTB-Tools Ubuntu 8.04

Pada post sebelumnya saya mencoba untuk menjelaskan pilihan-pilihan yang ada untuk bandwidth manajemen dengan menggunakan squid. Kemudian saya memilih untuk menggunakan kombinasi antara Squid ZPH dan HTB-Tools. 

Di bawah ini saya mencoba untuk menjelaskan bagaimana saya dapat menjalankan fungsi Squid ZPH di Ubuntu Server 8.04. 

Kebutuhan instalasi:
  • HTB-Tools yang sudah berfungsi normal
  • Squid 2.6.x yang sudah di patch ZPH atau Squid 2.7.x 
Sistem yang ditest berjalan dengan:
  • Ubuntu 8.04.1 Server 
  • HTB-Tools 0.3.0a
  • Squid 2.7.STABLE 3

KONFIGURASI SQUID

Tambahkan baris berikut di squid.conf

zph_mode tos
zph_local 0x30
zph_parent 0
zph_option 136

Restart konfigurasi squid

# squid -k reconfigure

KONFIGURASI HTB-TOOLS

Pertama generate konfigurasi HTB dengan q_parser, dengan perintah: 

# q_parser [interface yang digunakan] 10000 10000 [lokasi file/eth1-qos.cfg] > [direktori tujuan]/eth1-qos.sh

Contoh:

# q_parser eth1 10000 10000 /etc/htb/eth1-qos.cfg > /home/admin/eth1-qos.sh

Selanjutnya buka direktori tujuan:

# cd /home/admin 

Selanjutnya buka file eth1-qos.sh

# vi eth1-qos.sh

Kemudian cari baris berikut:

$TC qdisc add dev $DEV parent 1:0x10 handle 0x10: pfifo limit 5

Tambahkan baris berikut di bawahnya:

$TC class add dev $DEV parent 1:1 classid 1:0x15 htb rate 10Mbit
$TC filter add dev $DEV parent 1:0 protocol ip prio 1 u32 match ip protocol 0x6 0xff match ip tos 0x30 0xff flowid 1:15

Sehingga menjadi:

$TC qdisc add dev $DEV parent 1:0x10 handle 0x10: pfifo limit 5
$TC class add dev $DEV parent 1:1 classid 1:0x15 htb rate 10Mbit
$TC filter add dev $DEV parent 1:0 protocol ip prio 1 u32 match ip protocol 0x6 0xff match ip tos 0x30 0xff flowid 1:15

Setelah menyimpan file eth1-qos.sh, selanjutnya buat file tersebut dapat dieksekusi oleh sistem:

# chmod +x eth1-qos.sh

Kemudian eksekusi file tersebut dengan perintah:

# ./eth1-qos.sh

Terimakasih untuk:


Solusi Bandwidth Management

Optimalisasi penggunaan bandwidth adalah salah satu kewajiban dari administrator jaringan di suatu institusi atau kantor. Penggunaan bandwidth haruslah diusahakan seoptimal mungkin, sehingga pemakaian internet oleh user dapat dikontrol dengan baik. 

Bandwidth management dapat dilakukan dengan berbagai cara,  mulai dari squid dengan delay_poolsnya yang cukup efektif untuk membatasi akses melalui http (port 80) dan kemudian penggunaan HTB yang dapat digunakan untuk mengontrol traffic untuk semua port. 

Squid, selain berfungsi untuk bandwidth manajemen memungkinkan penggunanya untuk menghemat bandwidth internet. Squid berfungsi sebagai proxy server, sehingga halaman/file yang sudah diakses oleh pengguna yang menggunakan proxy server yang sama akan disimpan di dalam memory/harddisk. Sehingga ketika pengguna lain ingin mengakses halaman website/file yang sama. Proxy server tinggal memberikan data yang ada di dalam cachenya, sehingga tidak menggunakan koneksi internet lagi. Hal ini menguntungkan kedua belah pihak, karena pengguna akan mendapatkan halaman/file yang diinginkan lebih cepat (karena menggunakan koneksi lokal) dan bandwidth internet secara keseluruhan akan dihemat karena proxy server tidak lagi mengunduh data yang diinginkan pengguna dari internet. 

Permasalahan selanjutnya adalah apabila proxy server dan bandwidth manajemen (HTB)berada dalam satu server yang sama. HTB yang dijalankan dalam satu server dengan proxy akan membatasi semua jenis koneksi yang berasal dari server,  tidak perduli apakah traffic itu berasal dari internet atau berasal dari cache proxy. Konfigurasi seperti ini tidak efisien, karena seharusnya pengguna dapat mengunduh data yang terdapat di cache proxy dengan kecepatan penuh. Tanpa dibatasi oleh HTB. 

Contoh: 

Apabila bandwidth yang tersedia sebesar 512kbps dan dibagi untuk 4 client, masing-masing 128kbps. (Pembatasan dilakukan dengan menggunakan HTB) 

Maka bandwidth maksimum yang didapatkan oleh client (pengguna) adalah 128kbps, ketika koneksi penuh. Tidak perduli apakah data yang diakses itu sudah berada di cache proxy atau tidak. 

Yang kita inginkan adalah apabila data yang ingin diakes sudah berada di cache proxy, maka client tersebut harus dapat mengunduhnya dengan kecepatan LAN biasa (100mbps). 

Solusi:

Ada beberapa macam solusi yang saya temukan untuk permasalahan ini. 

1. Menggunakan Mikrotik <--> Squid with Tproxy  (2 Box)
2. Menggunakan Squid with ZPH <--> Mikrotik (2 Box)

3. Menggunakan Squid with ZPH+HTB (1 Box)

Dari berbagai solusi yang ada, akhirnya aku memutuskan untuk menggunakan pilihan yang ketiga. Tapi biar post ini gak terlalu panjang, jadi nanti aku post lagi khusus untuk konfigurasi Squid ZPH+HTB-Tools. 

Forum linux.or.id lagi down sih, tadinya mau ikutan diskusi disana juga. Mau berbagi pengalaman juga ama yang lain. Siapa tau ada yang menghadapi masalah yang sama.
 

How to Disable Qmail Queue Scanner?

Recently I have problem with qmail, it can't send or receive email because qmail-scanner error problem.  

(/var/log/maillog) 
Requeuing: Insecure directory in $ENV{PATH} while running with -T switch at /var/qmail/bin/qmail-scanner-queue.pl line 1351,line 51.

So I remove qmail-scanner-queue for temporary. 

#vi /var/qmail/supervise/qmail-smtpd/run

Search this line below and remove it

QMAILQUEUE="/var/qmail/bin/qmail-scanner-queue.pl" ; export QMAILQUEUE 

Before 

#!/bin/sh
QMAILQUEUE="/var/qmail/bin/qmail-scanner-queue.pl" ; export QMAILQUEUE
QMAILDUID=`id -u vpopmail`
NOFILESGID=`id -g vpopmail`
MAXSMTPD=`cat /var/qmail/control/concurrencyincoming`
...
...
...

After

#!/bin/sh
QMAILDUID=`id -u vpopmail`
NOFILESGID=`id -g vpopmail`
MAXSMTPD=`cat /var/qmail/control/concurrencyincoming`
...
...
...

Then, qmail working without qmail queue scanner.

Friday, October 03, 2008

Mail Server Error! Siap-siap migrasi ke Mail Server Baru

Seminggu ini aku berusaha agar mail server yang telah berjalan selama 2 tahun lebih itu dapat berfungsi dengan normal kembali. Berbagai jenis forum sudah aku kunjungi, berbagai jenis kata kunci sudah aku gunakan di google dan juga yahoo search. Beratus-ratus halaman sudah aku baca tapi tetap saja aku tidak menemukan solusi yang tepat untuk permasalahan di mail server ini. 

Apa yang harus aku lakukan dengan error di bawah ini? (*diambil dari /var/log/maillog server email) 

Requeuing: Insecure directory in $ENV{PATH} while running with -T switch at /var/qmail/bin/qmail-scanner-queue.pl line 1351, line 51.

Mungkin ada yang tahu solusi dari masalah ini? Aku sudah tidak tahu harus berbuat apa lagi. Mail Server ini tadinya berjalan dengan "baik" selama kurang lebih dua tahun.  

Adapun mail server ini menggunakan : 
  • OS: Fedora Core 4 (Iya, aku tau udah versi lama... tapi masih stabil lho..) 
  • Qmailrocks (Ini sumber dari semua masalah itu ) 
Mungkin memang sudah saatnya aku membangun server email yang baru, yang lebih stabil dan mudah manajemennya. 

Sekarang aku lagi menjajaki untuk membangun server email dengan menggunakan: 
  • Ubuntu 8.04 
  • Zimbra Collaboration Suite
Siap Berjuang!!! Where there is a will. There is a way.